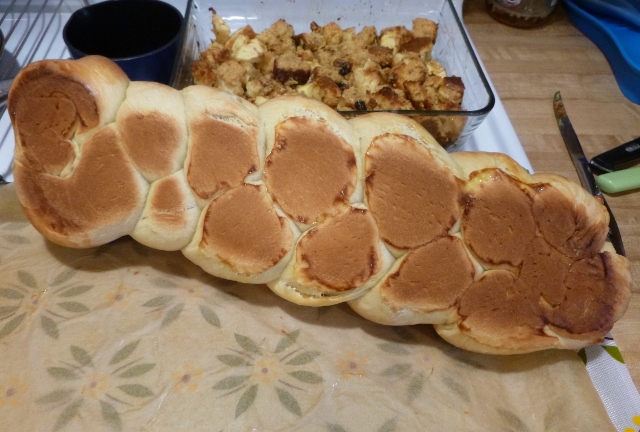
Classic Challah bread. This is a three-braid loaf. The golden brown color can be attributed to including honey as an ingredient and the egg wash applied before baking.
“I could live on challah bread, the Jewish kosher bread, quite happily.” Dan Aykroyd
Classic Challah
I first was introduced to Challah (pronounced Hah’-lah) bread when I moved to Columbia, Missouri in early 2001. Uprise Bakery, then located in a basement underneath a shoe store, on certain days baked, if I recall correctly, Challah bread. The Challah bread from Uprise Bakery was an egg bread that dried out quickly. I could not eat a loaf on my own before it dried out and was only fit for the foxes living down on Hinkson Creek to gnaw on.
Two Challah loaves on the Jewish Shabbat table commemorate manna falling from heaven when the Israelites wandered the desert after the Exodus. The manna fell a double portion the day before Sabbath or a holiday. Depending on the source describing the Jewish tradition, Challah is used and treated differently in religious rituals. A small portion of the dough, or baked bread, is set aside as a representative Temple offering. Challah can refer the act of separating the offering before the dough is braided. Ingredients can also be determined by religious tenets. The Shabbat and Jewish holiday meals start with two whole loaves, or twelve loaves, of kosher bread. By braiding six strands, the two loaves could represent twelve loaves. I would recommend you research Challah bread and discover its role in Jewish rituals for yourself.
King Arthur Flour Classic Challah bread recipe came together with ease. I had all the ingredients in the pantry. I weighed the dry and wet ingredients in grams. I used canola oil as the vegetable oil. While everything worked well this time, next time I make this recipe I will bring the eggs to room temperature before adding and mixing. Mixing 115 F (46 C) water and cold eggs made me nervous. One package of instant yeast did not quite fill a tablespoon, but I used only the one package. I combined the ingredients in the order listed. Using a stand mixer, the dough mixed and then kneaded with a dough hook for eight minutes. I then consulted the family baker, my father, who agreed with me the dough was much to wet. I was expecting a wet dough because of the eggs. Some sweet bread dough is a wet dough, but this was beyond expectation.
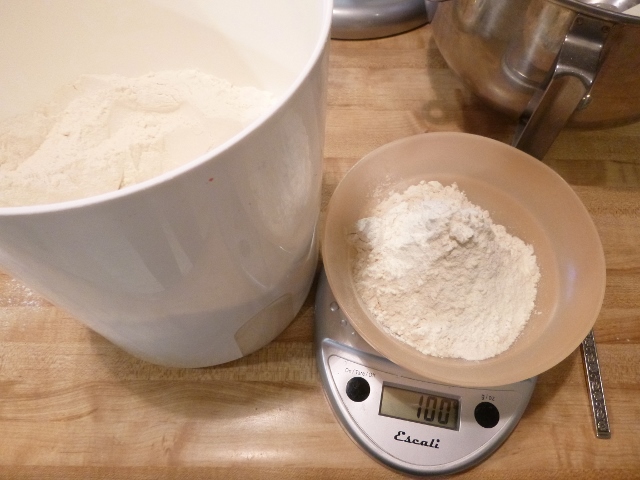
I weighed the dry and wet ingredients in grams.
There is something called the Baker’s Ratio or Baker’s Percentage. All good bread recipes follow this “magic” or “golden” ratio: 5 parts flour: 3 parts liquid. It does not matter if the bread is dinner rolls made with real, melted European butter or pizza dough made with cheap olive oil, both follow this ratio. Same flour, salt, and yeast, different tasting oils. The Baker’s Percentage is a ratio that determines how much of any ingredient needs to be present in proportion to the weight of flour. Egg or sweet breads tend to be on the wet side, violating the Baker’s Percentage because the eggs provide more liquid. For this recipe I did not weigh the eggs. I did not think to weigh the eggs. Next time I use eggs I will weigh the eggs. This Challah recipe also calls for 85 g honey. Honey is also a liquid, so you need to account for that weight in the 3 parts liquid. I calculated with the called-for 482 g flour, you would be permitted 337 g liquid. This Challah recipe’s 113 g water + 74 g vegetable oil + 85 g equals 272 g total liquid. This allows an additional 65 g for two liquid eggs. Two local farm-raised winter eggs should weigh, without shell, about 95 g. This would produce a wet dough.

I mixed the ingredients in the amounts called for by the recipe. After 8 minutes of kneading by the stand mixer I stopped to assess the situation. The dough is too wet.
A tablespoon of flour, each weighing 10 grams, was added at a time to the mixing dough for a total of 4 tablespoons, or 40 grams, before the dough looked and felt right. Under the Baker’s Percentage, the flour addition brought the weight of flour to 522 g and the estimated liquid weight to 365 g. The stand mixer kneaded for an additional 4 minutes.

After the addition of 40 g flour and four minutes of additional kneading, the dough was fine.
The dough was allowed to raise in a greased bowl on top of the refrigerator for 2 1/2 hours.

Challah dough (on your right) at end of the first raise on top of the refrigerator. Next to Challah dough is English muffin dough.
Working on a greased kneading mat, I weighed out three balls of dough, each weighing 306 grams. I used no flour when I worked the dough. I watched the King Arthur Four braiding demonstration video while the dough balls rested. Each ball was hand-rolled into a shorter than 20-in (51-cm) rope which shrank back every time I lifted my hands. The ropes rested on the greased kneading mat covered with greased wax paper for 10 minutes. The ropes did not shrink after resting, and stayed 20 in (51 cm) long. The three-braid loaf seemed most appropriate for a simple evening soup dinner. The loaf braided easy. I placed the loaf on a parchment paper covered silicon baking mat covering a heavy baking pan.

Braiding a three-braid Challah loaf. I used a greased surface and did not add any more flour when working with the dough.
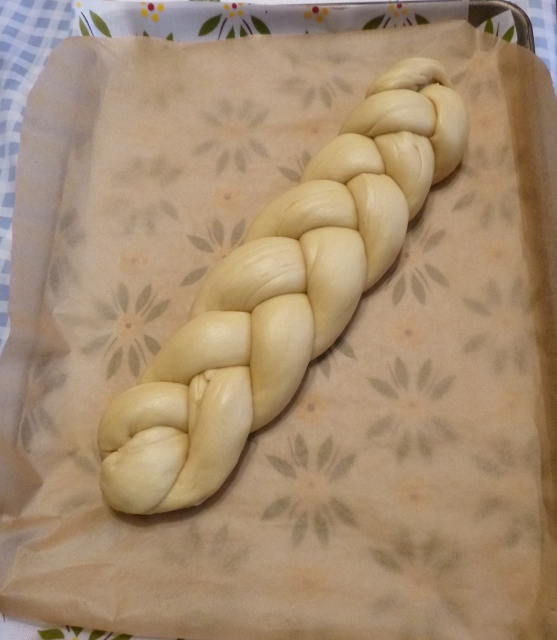
The three-braid Challah loaf on a heavy baking sheet with a silicon baking mat and parchment paper before raising.

After raising for 2 1/2 hours, the three-braid Challah loaf is ready for an egg-water wash before being placed in a 375 F (190.5 C) oven.
I covered the loaf with a greased wax paper. The braided loaf raised for 2 1/2 hours on top of the refrigerator. I brushed the egg-water glaze over the entire loaf. I set the heavy baking sheet onto a larger heavy baking sheet as directed by the recipe in order to prevent the loaf bottom from over browning or scorching. The loaf baked at 375 F (190.5 C) for 20 minutes. I rotated the loaf at 20 minutes for even baking in the oven.

The three-braid Challah loaf has baked for 20 minutes.
I placed a piece of tented aluminum foil over the loaf. The loaf was baked in the oven for another 13 minutes.
Classic Challah bread. This is a three-braid loaf. The golden brown color can be attributed to including honey as an ingredient and the egg wash applied before baking.
At the end of the 13 minutes the internal temperature of the bread was 200 F. The 13 minutes may have been to long to continue baking. Because of all the heat escaping when I turned the baking sheet, I was concerned with not allowing the bread enough time undisturbed in a hot oven. The aluminum foil slowed the browning, but did not completely stop browning. You will want to watch and monitor the bread towards the end of baking time so that it does not scorch.
The bottom of the Challah loaf.
This bread went very well with the Cajun-spiced soup. You can get 16 servings from the bread. I took 1/3 of the loaf, sliced, to work on Monday. The Challah loaf was enjoyed by all. The texture, color, and taste was an enjoyable change from the whole wheat or sourdough breads my family usually makes. I am glad I now have Challah bread within my repertoire.
There are different ways to approach the ritual meaning or what Challah bread represents inside Jewish culture. I suggest you read and contemplate for yourself.
Wikipedia is a good introduction to Challah bread and its use in religious life. Challah
Another source of Challah bread information. https://headcoverings-by-devorah.com/Challah.html
Here is another source of information: https://www.myjewishlearning.com/article/challah/
I would be remiss if I did not include the Uprise Bakery website. They moved to a building they share with Ragtag Cinema and 9th Street Video on Hitt Street next to the Presbyterian Church. http://www.uprisebakery.com/
A website that explains the Baker’s Percentage is here: https://bread-magazine.com/master-formula/